Nowadays, various types of machines are available in the kitchen to get all the tasks done quickly. These machines make all our work easy. We take the help of machines for various vegetable cutting and cooking. Today I will discuss one such important machine which I have made myself at home. This machine is a dough maker. Before making bread, the dough has to be made from flour, which is time-consuming and hard-working. I made this doe maker machine to do it quickly. A bowl is fit on the machine, add the required amount of flour and water, and start the machine to make the dough. The method by which I made this machine and the materials required to make this machine have been discussed in detail below.
Parts & Materials:
To make this dough maker machine you have to purchase some materials from the local market or online. I have discussed in detail below what materials I have used to make this machine, and where I bought it from.
Motor:
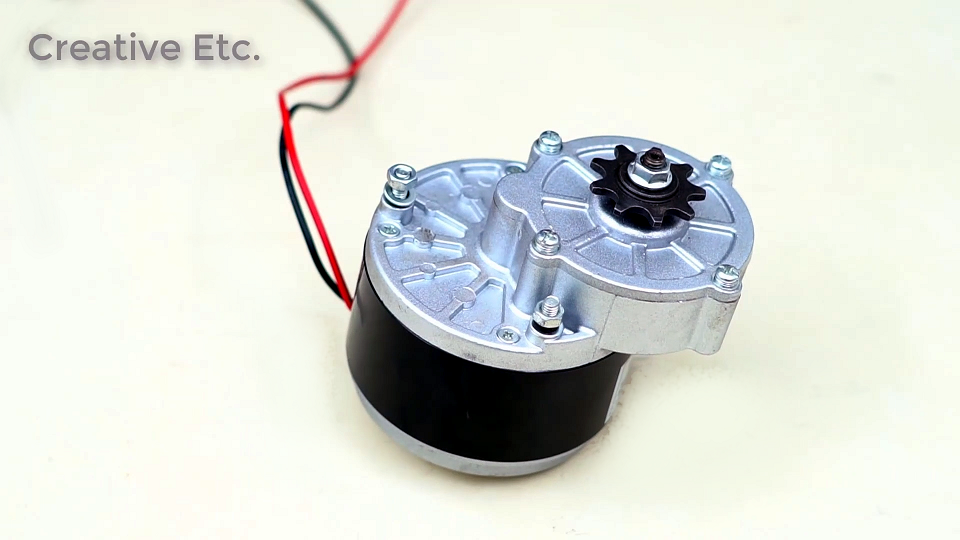
I used a 24v,250w gear motor to make this dough maker machine which I bought online. It is usually to make electric cycles or electric vehicles. This motor is small in size but enough powerful. Its model is MY1016Z2. This 24v,250 watts motor has high torque. The price of this motor was Rs 3600 online, if you buy it from the local market then it will cost Rs2600. The online link is given below.
Wooden Planks:
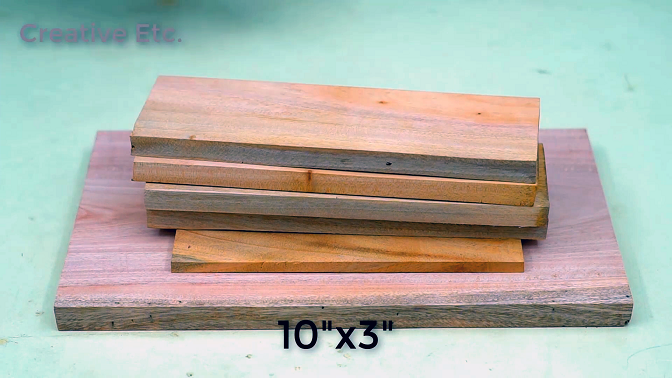
This doe maker machine is built on a wooden structure. I have used Mahogany wood here to make this structure. A total of 6 wooden planks are required here. Below are the measurements of these wooden planks…..
One piece of 127 inch, one piece of 85 inch, and four pieces of 10*3 inch planks are required here.
Steel Sauce Pan:

The pot I used in this dough maker machine is a stainless steel 2-liter saucepan. Its weight is 499 grams. I bought it online below is the link to buy it.
Steel Rod:

I used a steel rod which was a bicycle fork guard of a certain shape to make the part of this machine that will work for kneading the dough, which is attached to the motor. In this case, I used a steel rod instead of iron because the iron rod may be rusted. The rod is set on the motor, in such a way that it fits inside the saucepan.
Clear Resin Spray for Polish:
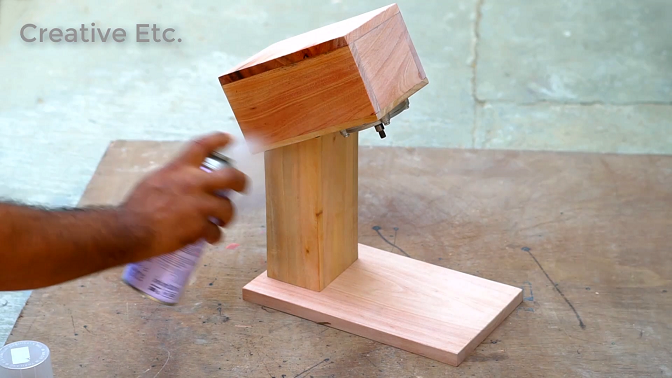
Any product made of wood looks beautiful when polished. I used clear resin spray to polish this dough maker machine. This spray is available to buy in local markets and online. The online buying link is given below.
12V 10Amh Power Supply:
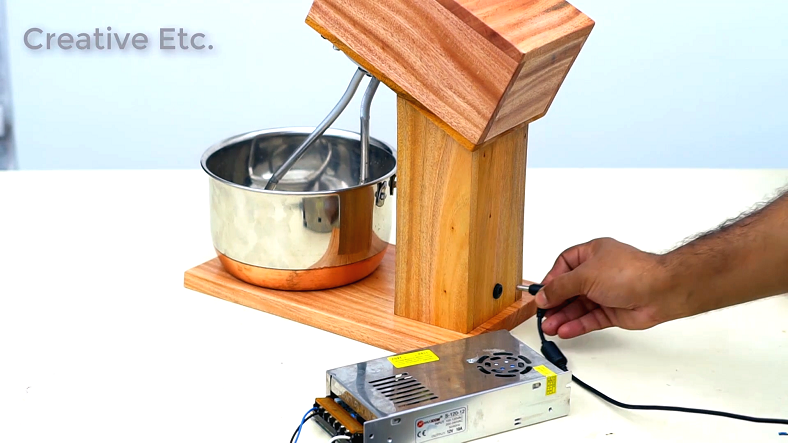
I have used a 12V 10AAh DC power supply to power this dough maker. Although the motor is 24 volts, I have used a 12-volt power supply here because using a 24-volt power supply would have made the motor speed too high and the flour would have sputtered out. This power supply is used for various purposes. This power supply is used to power various devices like CC cameras, printers, and led.
How to Make:

First I cut two pieces of wood planks measuring 12″X 7″ and 8″X 5″. Then I cut four pieces of wood measuring 10″X3”. The wood where the motor will be mounted, I cut the wood according to the shape of the motor. Four 10″/3″ inch planks were stacked together to make a box. It will be used as a stand. I added the remaining two planks on both sides of the stand. Once the wooden structure was made, I used an angle grinder to sand it. The structure is polished very well with this angle grinder. Then I set the motor in a certain place. I bent a steel rod to a specific shape and fitted it to the motor head. The dough will be formed by rotating this rod. Then I cut off the handle of the saucepan and fit the pan to the bottom wooden plank. Then I added a socket to power the motor and made a connection. Finally, I polished the dough maker machine nicely with clear resin spray. Once the polish is dry it can be used.
Use of the Machine:
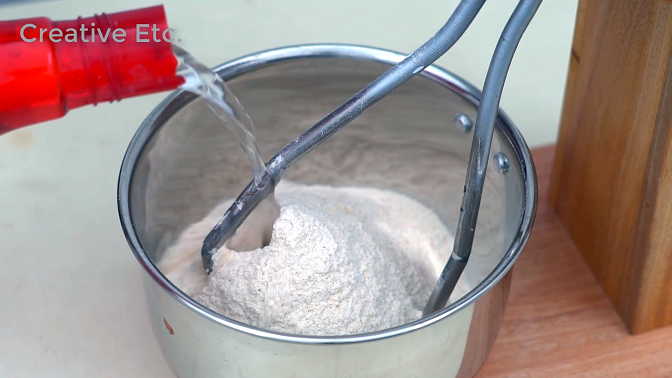
In modern life almost all of us are busy. So if their daily work can be completed easily, then it is very convenient. In this case, it can be said that before making bread, you have to make dough with flour, which is a little boring for many who knead by hand and it takes a lot of time. In this case, this dough maker is very convenient. In that case, if you pour flour and water into the pan of this machine and turn on the machine, the dough will be made automatically. This machine can be used for making dough at home as well as in small bakeries.
Advantages and Disadvantages of the Machine:
Every machine has some advantages and disadvantages. I have discussed below the advantages and disadvantages of the dough maker machine which made by me.
⦁ With the help of this dough maker, the dough can be made very easily in a short time. But a large amount of dough can not be made through this machine at once.
⦁ Since this dough maker is electric, it cannot be used if the power supply is off.
⦁ The dough maker machines available in the market are very expensive. In this case, it cost me a lot less to make this machine. I spent around 3000 rupees to make this machine. Which is much less than the machines available in the market.
Some Dough Maker:
Several dough makers are available in the market. I have discussed some such machines below.
Clear Line 650 Watt Dough Kneader:
This dough maker of Clear Line is 650 Watt. The bowl provided in it is made of stainless steel. It is powered on by 220 volts. This convenient machine is available to buy online. Link -https://amzn.to/3KUz7Lv
AGARO Royal Stand Mixer:
This mixer of Agaro company is 1000 watts. It has a 5-liter bowl. It has eight-speed settings. A stainless steel blade is used in this mixer. This is an online product. link- https://amzn.to/3UvrRJg
The Material Link
24V 250W Electric Motor – https://amzn.to/3KV6pKF
Steel Sauce Pan – https://amzn.to/3GGHVCm
12v,10A dc power supply: https://amzn.to/36UVXhJ