One of today’s most advanced battery technologies is the lithium-ion battery. The invention and use of this battery have created a revolutionary role in the world. These rechargeable batteries are used in electric vehicles and portable electronics. The energy density of these batteries is higher than other batteries. Along with this battery, lithium ferro-phosphate, lithium polymer and various types of batteries are currently in use.
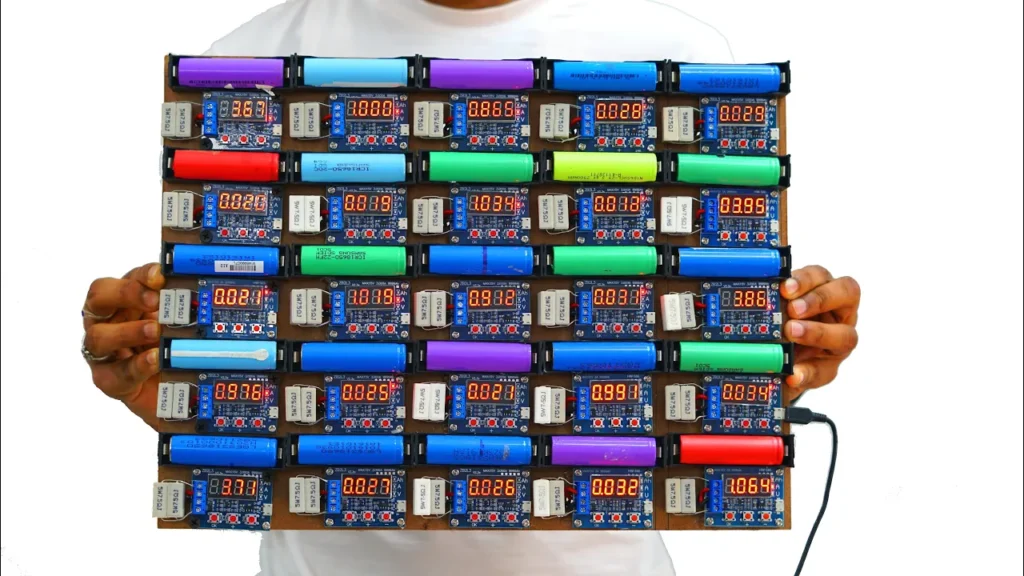
Battery packs of different volts are made by connecting the battery cells. Battery cells are often not healthy, and the ability to hold the charge is low, and some cells cannot hold the charge at all. If there are some bad battery cells among good cells the battery pack also becomes weak. Capacity testing of battery cells is very important to avoid these problems. When making the battery pack, the batteries of the same capacity need to be shorted. Besides, if a battery pack goes bad, it is necessary to find and remove the bad battery cells. For these tasks, I have made a battery capacity tester at home. Through this, the voltage and capacity of each cell can be known by testing the batteries. What materials are needed to make this capacity tester, how I made it, and where did I buy the materials, I have discussed this in detail below.
Parts & Materials:
Each of the parts I needed to build this lithium-ion battery tester was very important. It is not possible to make the battery cell taster properly if one of its parts is omitted. I have purchased all the parts required to make this battery taster from various online sites. What I used these parts for, from where I bought them, and how I made the battery cell taster, I have discussed below in detail.
Lithium Battery Capacity Taster Kit:
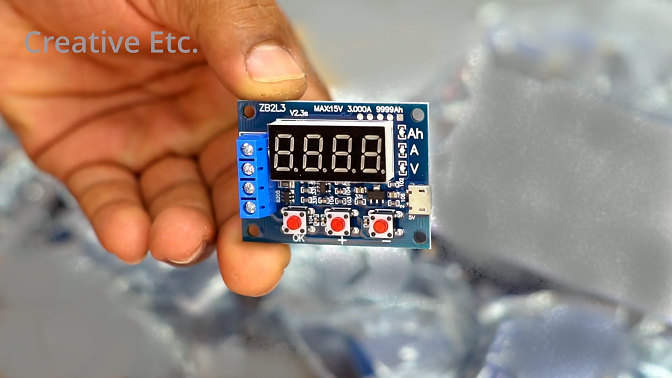
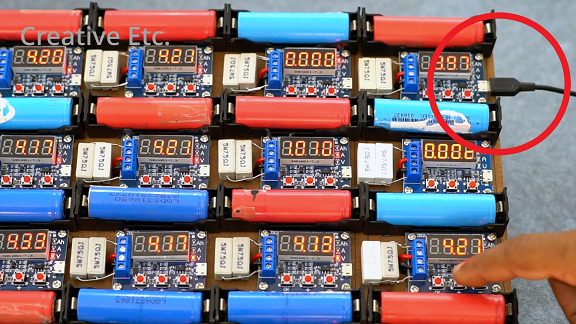
The kit I used to make this battery capacity tester is the ZB2L3 18650. This kit supports a maximum of 9999 Ah. This kit has a small display to show the battery capacity. I bought these kits online. As many battery cells are to be tested together, many kits will need to be purchased. I bought a total of 25 kits for making this capacity taster at Rs.310 each. A total of 7750 rupees was spent to buy these 25 kits. The online buying link is given below.
Battery Cell Holder:
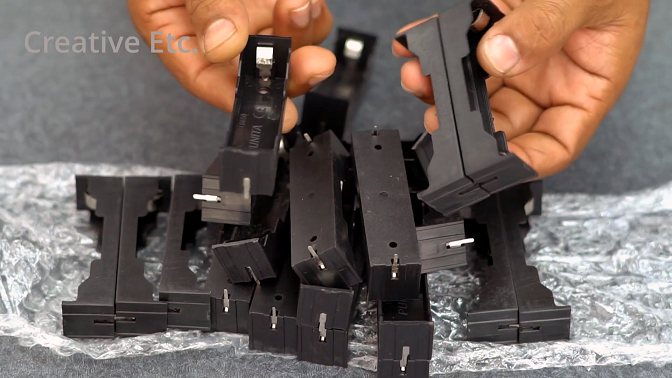
To test the capacity of the battery cell, it is necessary to connect the battery cell to the capacity tester. Battery cell holders are required for this task. The battery cell holder is connected to the tester kit. The battery cell has to be inserted into this holder. A variety of battery holders are available for purchase. For example, 1-cell battery holder, 2-cell, 4-cell, etc. I have collected 1 cell holder because each tester kit needs one cell holder. I bought this holder online for 25 pcs for Rs.900. Online buying link is given below.
Non-Conductive Board:
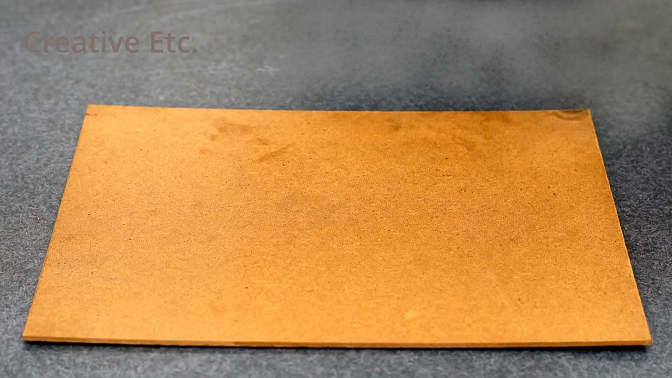
Since I designed the tester to test 25 battery cells at once, I would need 25 tester kits and 25 battery holders. A non-conductive board is required to assemble and align so many taster kits and battery holders. you can use sunmica, wood board, and plywood for this work. I have used a 16*14 inch cardboard here. This cardboard can be bought in the local market. I bought this cardboard for 25 rupees per square foot.
Resistor:
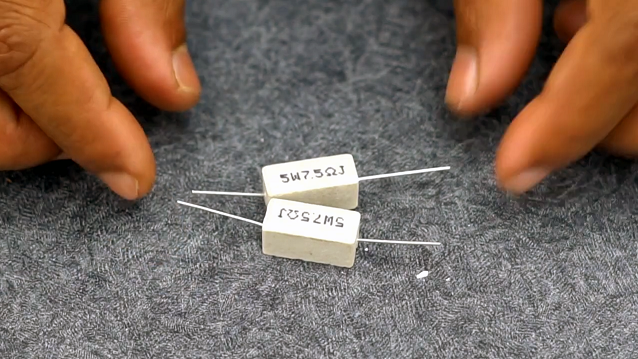
To test the capacity of the battery cell, it is necessary to discharge the battery cell. I used 10J resistor for discharging here. Each 10J resistor can discharge 500 mAh. I want to discharge each battery cell at a rate of 1000 mAh. For this, 2 resistors are required for each battery. These resistors were provided with the battery tester kit.
Battery Charger:
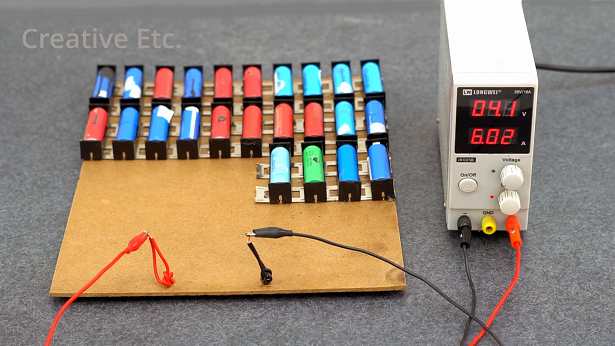
To test the capacity of the battery cell it is necessary to discharge it. If you want to discharge it, you have to fully charge it first. A battery charger is required for this. Various battery chargers are available in the market. You can use the charger at your convenience. I arranged to charge 25 battery cells simultaneously by connecting 25 battery holders here. In this case, I used a 30-volt power supply, which can charge different types of batteries. Its voltage and ampere can be set manually.
Mobile Charger:
A micro USB mobile charger will be required to power the capacity tester kits. This mobile charger can be purchased from local mobile shops for under 200 rupees.
How to Make:
Even if the capacity tester kit and battery holders are set on the same side of the cardboard, their wire connections will be made on the back side of the board. For this, we made the holes in the board according to the required size. Then I set the capacity tester and battery holder on the front side of the board. While doing this, it should be noted that a battery holder is set next to each capacity tester. Then we took out the holder and the wires of the kit through the hole behind the board. This time the wires of each holder are connected to the testing kit through another hole. And the power wires of each testing kit are connected in parallel through the nickel strip on the back side so that when one kit is powered, each kit gets power.
How does it Work:
⦁ First, fully charge the battery cell.
⦁ Insert the battery into the holder and power the kit. It shows the battery voltage then.
⦁ Set the cut-off voltage of the specific battery that you want to test, by pressing the + – button on the board.
⦁ Now press the OK button to start discharging.
⦁ Then you can show the rate of discharge. Total discharged current and voltage respectively one by one to the display.
⦁ After full discharge to the cut-off voltage, it shows the total capacity on the display in the form of mAh. That is the capacity of a specific battery.
The Material Link
Battery tester kit – https://amzn.to/3Dm7eXn
Battery holder – https://amzn.to/3IROpfM
Li-ion battery charger – https://amzn.to/36CQZt8